

Yes, you can sell items on Amazon. The bigger question is whether you can set the business up in a way that survives the first round of mistakes that knock new sellers off course.
Amazon gives small operators access to a market that would be expensive and slow to build on their own. It also demands tighter execution than many beginners expect. Account verification can stall. Product restrictions can block a launch. Fees can erase margin if the fulfillment model is wrong. Sellers who make those calls carefully usually gain traction faster than sellers who rush to get a first listing live.
That trade-off is clear. Amazon provides traffic, buyer trust, and fulfillment infrastructure in exchange for compliance, responsiveness, and operational discipline.
A lot of new sellers fail before the first sale, not because the opportunity is weak, but because they make expensive decisions in the wrong order. They buy inventory before checking whether a category is gated. They open an account with documents that do not match. They choose FBA or FBM based on convenience instead of unit economics. They write listings without understanding policy, then spend weeks fixing preventable issues.
This guide is built around those decision points. Instead of handing you a generic checklist, it shows you where setup choices affect approval speed, margins, risk, and your ability to scale once sales start coming in.
The Short Answer Yes and The Billion-Dollar Opportunity
More than 55,000 independent sellers in the US have crossed $1 million in annual Amazon sales, and US-based independent sellers average more than $290,000 a year, as noted earlier. Those numbers should not be read as a promise. They show that Amazon is still large enough for well-run businesses to grow past hobby income.

Why Amazon is still worth entering
New sellers often ask the wrong question. The issue is not whether Amazon is crowded. The issue is whether you can enter with a product, cost structure, and operating process that hold up under Amazon’s rules.
Amazon still concentrates buying intent better than almost any sales channel available to a new business. Shoppers arrive ready to compare, buy, and reorder. That shortens the path to a first sale, but it also exposes weak decisions fast. A bad sourcing choice, poor margins, or sloppy prep work gets punished quickly on Amazon because the market is efficient and the competition is visible.
That is why I tell new sellers to treat Amazon as a decision engine, not just a storefront. Each early choice affects the next one. Product selection affects category approval. Category approval affects launch timing. Launch timing affects cash flow. Cash flow affects whether you can restock before momentum dies.
Practical rule: Do not ask whether Amazon is too competitive. Ask whether your setup is better than the average new seller’s setup.
For product research, a solid Amazon seller buying checklist helps filter out items that look promising on the surface but break down once fees, restrictions, and reorder risk enter the picture.
What makes the opportunity real
Opportunity is not access alone. It is access paired with infrastructure.
Amazon gives a new seller distribution, payment processing, customer trust, and fulfillment options from day one. Building that stack independently takes time and money. On Amazon, you can start testing demand much faster. The trade-off is tighter compliance, thinner margins on weak products, and less room for operational mistakes.
A lot of beginners lose money. They see demand and skip the economics. They source inventory before checking whether they can effectively track inventory, forecast replenishment, or absorb storage and return costs. A product can sell well and still be a poor Amazon business if the margin is too thin or the operational load is too high.
Amazon remains a strong opportunity for sellers who make decisions in the right order. The upside is real. So is the penalty for getting the basics wrong.
Your Seller Account Pre-Launch Checklist
Roughly 20 to 30 percent of new Amazon seller applications get held up during review, according to Cart’s breakdown of Amazon seller account requirements. In practice, those delays usually come from a small set of preventable mistakes: mismatched names, weak document scans, outdated address proof, or banking details that do not line up with the applicant.
Set up your paperwork before you touch Seller Central. That decision alone can save days of back-and-forth and, in some cases, prevent a suspended application that takes far longer to fix than it should.
What to gather before you register
Create one folder and load it with clean, current files. Use PDFs or sharp photos, and make sure every detail is readable without zooming in.
- Government-issued ID: Passport or driver’s license for the primary account contact. The legal name must match your application exactly.
- Business formation documents: LLC or corporation paperwork if you are registering as a business. Sole proprietors still need consistent legal identity details across every field they enter.
- Address verification: Utility bill, bank statement, or government document if Amazon requests proof of address. Cropped images and old statements cause avoidable problems.
- Tax information: SSN or EIN, based on how you plan to register.
- Bank account and charge card details: Use accounts you control directly. If Amazon asks for verification, you need fast access.
One mismatch can stall the whole account.
I have seen sellers lose a week over something as small as “Street” on one document and “St.” on another. Amazon does not treat that as a harmless formatting difference if the rest of the file set already looks inconsistent.
The decisions that affect launch speed
The first decision is your legal setup. Registering as a sole proprietor is faster for some sellers, but it can create cleanup work later if you plan to build a real brand, work with wholesale suppliers, or separate business finances properly. Forming an LLC before launch adds a step, but it often makes your tax setup, banking, and account ownership cleaner from day one.
The second decision is operational. New sellers focus on getting approved and forget that inventory mistakes start before the first shipment arrives. If you buy across retail, online arbitrage, wholesale, or liquidation channels, you need a basic process to effectively track inventory so you can reconcile purchases, spot stranded units, and avoid ordering the same item twice.
That trade-off matters early. A simple spreadsheet is fine if your catalog is small and you update it daily. Once SKUs, suppliers, and reorder dates start stacking up, loose tracking turns into margin loss.
Build your file stack like Amazon will review every line
Amazon cares about consistency more than effort. A complete folder with conflicting details is weaker than a smaller set of clean, matching documents.
A solid pre-launch file stack includes:
- Identity files with clear edges, no blur, and no glare.
- Business paperwork that matches the legal name you plan to use in Seller Central.
- Address proof that is recent and fully visible.
- Tax details entered exactly as they appear on official records.
- Banking information tied to the same person or entity applying.
This is also the point where sourcing discipline matters. Before buying inventory, run each product through a resale screening process such as this Amazon sellers buying checklist so you catch restrictions, weak margins, and listing issues before they become expensive mistakes.
The goal of this checklist is not paperwork for its own sake. It is reducing the failure points that slow approval, distort your numbers, and make the first 30 days harder than they need to be.
Choosing Your Seller Plan Individual vs Professional
This is the first strategy decision that has real downstream consequences. Don’t treat it like a box to click through.

When Individual makes sense
The Individual plan fits a cautious start. If you’re testing one product line, flipping a small amount of inventory, or learning Seller Central before expanding, it keeps your fixed commitment lower.
This plan works best when you’re validating product-market fit, not building a full machine yet. It’s the right choice for sellers who need to learn the workflow first, especially if they haven’t sourced repeatable inventory.
When Professional is the better move
The Professional plan makes more sense once you want speed, flexibility, and growth tools. It’s the plan serious sellers usually end up on because it aligns better with scaling inventory, handling multiple listings, and running a more structured operation.
A simple framework helps:
| Situation | Better fit |
|---|---|
| You’re testing slowly with limited inventory | Individual |
| You expect to sell consistently every month | Professional |
| You want a hobby-style setup | Individual |
| You want to build a repeatable business | Professional |
The actual break-even math matters, but the operational side matters more than beginners realize. If you already know you want to sell at meaningful volume, it’s often cleaner to start where your systems can grow.
What new sellers usually get wrong
The mistake isn’t picking Individual. The mistake is staying there too long while expecting Professional-level outcomes.
Some sellers want access to more tools, stronger listing control, and better competitive positioning, but they hesitate to upgrade because they’re thinking only about a monthly subscription cost. That’s the wrong frame. You should think about the plan in terms of what it enables.
This walkthrough helps if you want a visual explanation of how the account setup works in practice:
Pick the plan that matches the business you’re trying to build, not the one that feels safest today.
The better decision rule
Use Individual if your main goal is to learn the system with minimal commitment. Use Professional if you’re actively sourcing products, planning repeat inventory buys, or building around wholesale, private label, or structured online arbitrage.
Amazon rewards organized sellers. If you’re approaching this as a real business, your seller plan should reflect that.
Navigating Gated Categories and Product Restrictions
Beginners often burn money in this scenario. They buy inventory first, then discover Amazon won’t let them list it.
The phrase ungated category causes a lot of damage because people hear “ungated” and assume “open.” That’s not how Amazon works in practice. According to Helium 10’s guide to what you can sell without approval, 40%+ of seemingly open products are restricted at the brand or ASIN level, and approval often requires invoices and sales history.
Ungated doesn’t mean unrestricted
A category can appear open while a specific brand, subcategory, or individual ASIN is blocked. That means a seller can scan ten products in a store and only be allowed to sell a few of them.
That’s why broad category lists are a weak sourcing tool. They can point you in a direction, but they can’t tell you whether a specific product is sellable on your account.
Here’s the safer workflow:
- Check the exact ASIN first: Use the Add a Product tool in Seller Central before buying.
- Look for limitation language: If Amazon shows “Listing Limitations Apply,” stop and investigate.
- Review approval requirements: You may need invoices, account history, or compliance documents.
- Avoid assumption buys: Never source based on category-level advice alone.
A profitable product you can’t list is not inventory. It’s a tuition payment.
How to vet a product before spending money
The Add a Product tool is your first checkpoint. Search the item by name, brand, UPC, or ASIN and see whether your account can sell it. If you can’t, Amazon usually indicates whether approval is possible.
The second checkpoint is your paperwork. If approval requires invoices, don’t assume a retail receipt will solve the problem. Amazon typically wants supplier documentation that proves product origin and legitimacy.
A practical restriction filter
When you evaluate a product, ask these questions in order:
- Can my account sell this ASIN right now?
- If not, what documents does Amazon require?
- Can my supplier provide those documents cleanly?
- If approval takes time, will the opportunity still be worth it?
A lot of new sellers skip question three. That’s expensive. A supplier that can’t provide proper paperwork is a weak supplier for Amazon resale, no matter how good the price looks.
What works and what doesn’t
What works is patience and pre-checking every product. What doesn’t work is buying based on YouTube lists, “ungated” claims in Facebook groups, or generic retail arbitrage excitement.
Amazon has become more cautious around brand protection and counterfeit prevention. That’s good for serious sellers, but it means your sourcing process has to be stricter than your instincts.
Understanding Your Fees The FBA vs FBM Decision
Most new sellers don’t fail because sales are impossible. They fail because they don’t understand where profit disappears.
Amazon selling includes several layers of cost. Some fees apply no matter what. Others depend on how you fulfill orders. If you don’t know which is which, you’ll price products badly and buy inventory that looks profitable only on paper.
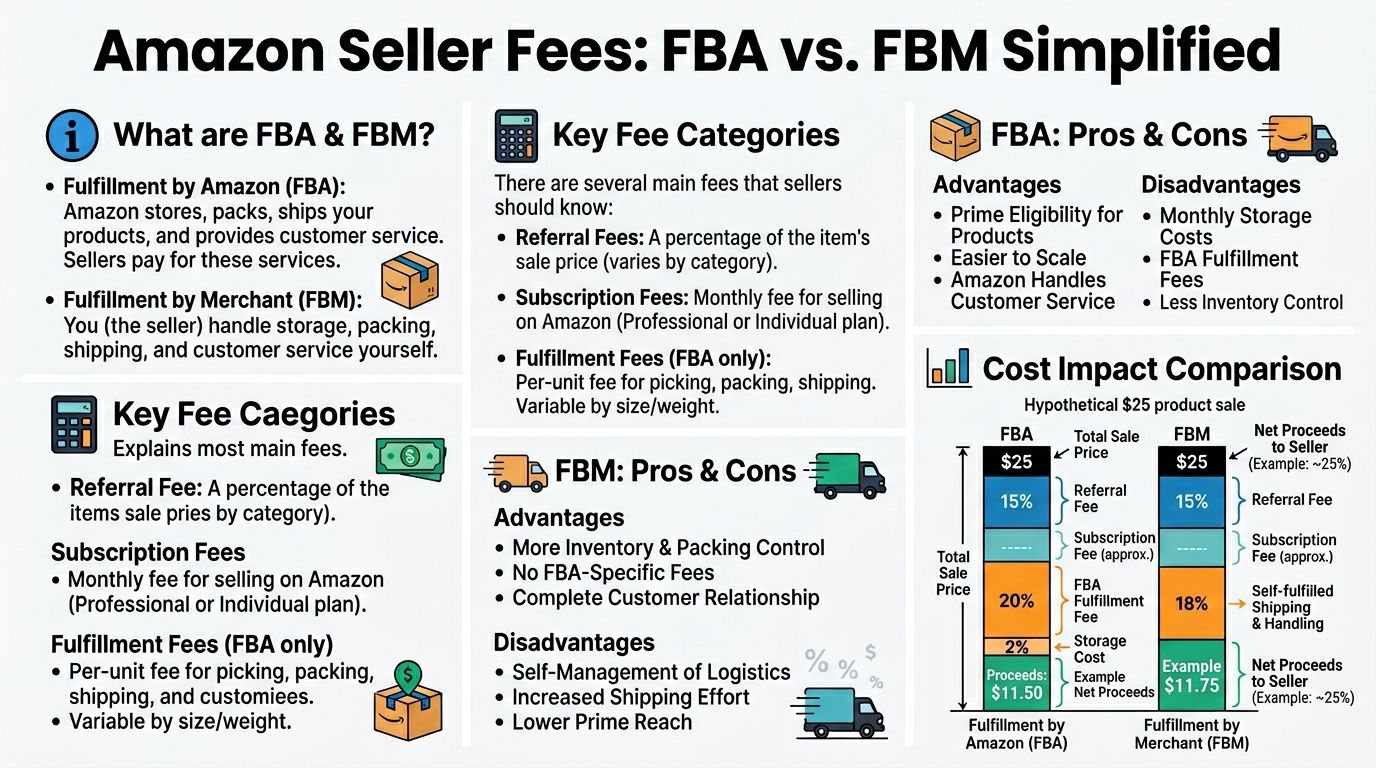
The core fee buckets
At a high level, sellers usually deal with:
- Referral fees: Amazon takes a percentage of the sale.
- Subscription fees: These depend on your seller plan.
- Closing or transaction-related costs: These can apply depending on category and setup.
- Fulfillment costs: These differ sharply between FBA and FBM.
The fulfillment model is the decision that changes your business most.
FBA and FBM are different businesses
With FBA, you send inventory to Amazon, and Amazon handles storage, packing, shipping, customer service on fulfilled orders, and much of the operational burden. With FBM, you keep and ship the inventory yourself or through your own warehouse partner.
That sounds like a logistics choice. It’s a business model choice.
| Area | FBA | FBM |
|---|---|---|
| Storage | Amazon stores inventory | You store inventory |
| Shipping | Amazon handles shipping | You handle shipping |
| Customer experience | More standardized | Depends on your operation |
| Operational control | Lower | Higher |
| Scalability | Strong if margins support it | Strong only with good systems |
When FBA is the better move
FBA usually makes sense when you want Amazon to carry more of the operational load. It also aligns well with sellers who want Prime-style convenience and less day-to-day shipping work.
Amazon’s marketplace is heavily built around seller services. One market summary notes that third-party sellers contributed over $156 billion in seller services revenue in 2024 and that third-party sellers drove over 60% of store sales, reinforcing how central marketplace logistics are to seller growth, according to Analyzer’s Amazon statistics roundup.
If you’re comparing business models more broadly, this look at Amazon FBA vs dropshipping helps clarify why fulfillment control, capital needs, and margin structure feel so different from one model to another.
FBA reduces friction. FBM increases control. Neither one is automatically better. The right choice depends on your product, your capital, and your tolerance for operational work.
When FBM is smarter
FBM can work better if your products are awkward to store, your margins are too thin for Amazon fulfillment fees, or you already have a strong shipping process outside Amazon. It also gives you tighter control over packaging, stock placement, and order handling.
But FBM punishes sloppy operators fast. If you ship late, answer customers slowly, or lose track of inventory, the account feels that immediately.
The real trade-off
Beginners often frame this as “Which is cheaper?” That’s incomplete.
The better question is: Which model leaves me with better margins after accounting for labor, shipping effort, stock management, customer expectations, and time? If FBA costs more but saves hours and improves sell-through, it may be the more profitable model. If FBM protects margin on a niche product and you can fulfill reliably, that can be the stronger choice.
Run the product through both scenarios before you buy inventory. Sellers who do that stay in control. Sellers who don’t end up surprised by fees they should have seen coming.
Your Step-by-Step Onboarding and Listing Playbook
Once your documents are ready and your plan is chosen, the setup itself is straightforward. The bigger challenge is getting through it without creating future problems.
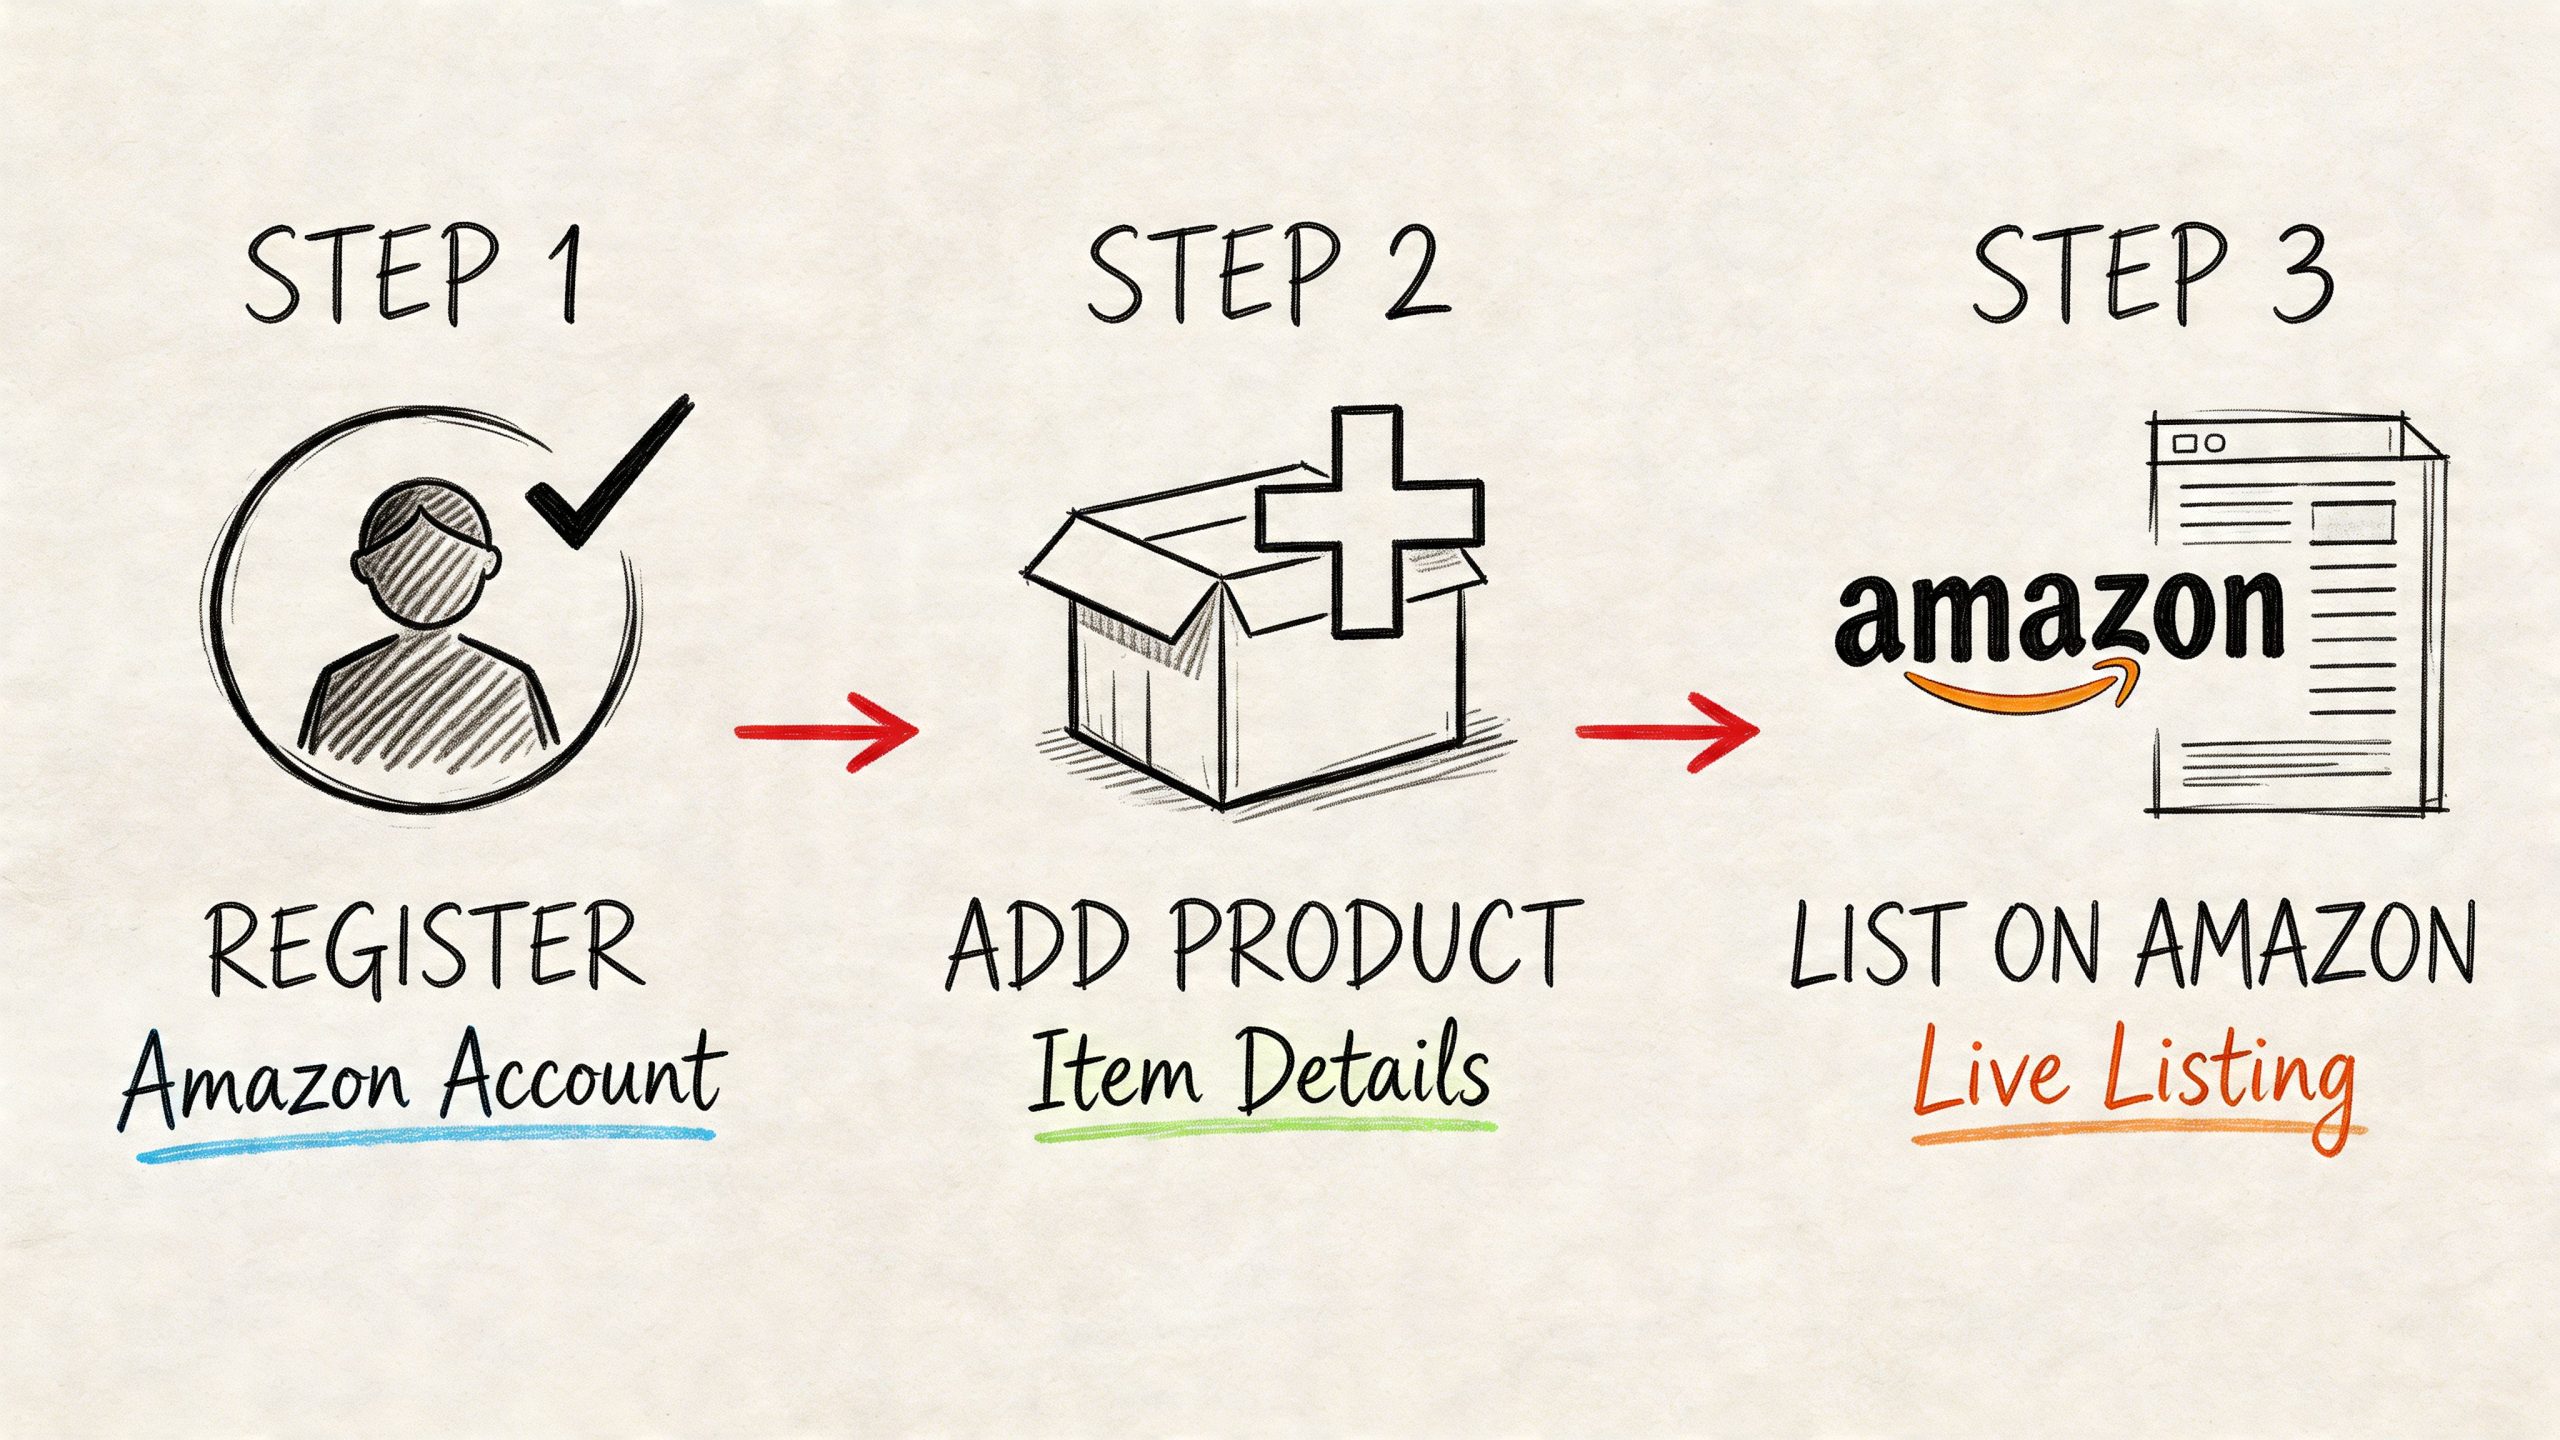
Step one, register with clean data
Open Seller Central and enter your legal business and contact information exactly as it appears on your supporting documents. Don’t shorten names, swap addresses, or enter a different banking entity because it seems more convenient.
Choose your seller plan based on the decision you already made. Then complete tax and payment details carefully. This part isn’t hard, but it’s where sloppiness creates verification friction later.
Step two, complete verification without improvising
Upload the required identity and business documents in clear, readable formats. If Amazon requests additional proof, respond with files that match the original application details.
Beginners often panic at this point and start editing information midstream. That usually makes things worse. Consistency wins.
Step three, create your first listing correctly
A first listing has to do more than exist. It has to comply.
According to Amazon’s listing requirements guidance, 60% of new seller suspensions stem from GTIN exemption denials or mismatches. The same source notes that compliant listings with 7+ high-quality images at 1000x1000px minimum on a white background, plus A+ Content, can increase conversion rates by 15-25%.
That gives you the order of operations:
- Confirm your GTIN path: Use a valid UPC, EAN, or ISBN when required. Don’t guess.
- Build the title for relevance: Clear product identity first. Search language second.
- Write bullets for buying decisions: Focus on features buyers care about.
- Upload compliant images: Main image rules matter. Lifestyle images support the sale.
- Check variation logic carefully: If the item comes in sizes, colors, or scents, set those relationships correctly.
Your first listing is not a draft. Amazon treats it like a record in a structured catalog, and bad inputs can create long cleanup work later.
What a strong beginner listing looks like
A good listing is clear before it is clever. It identifies the product fast, shows the buyer exactly what they’re getting, and avoids keyword stuffing that makes the page look spammy.
If you want a more detailed walkthrough for titles, bullets, images, and conversion-focused copy, this guide to Amazon listing optimization is a useful companion once the product is approved and ready to publish.
What to avoid on day one
Don’t list products with questionable barcodes. Don’t pull random images from the internet. Don’t write vague bullets full of hype. And don’t assume a product page is “good enough” because it’s live.
Live listings can still be suppressed, ignored, or underperforming. Clean setup is the cheapest advantage a new seller has.
Beyond Setup Common Pitfalls and Your First 90 Days
Getting approved feels like the finish line. It isn’t. It’s the point where Amazon stops evaluating your paperwork and starts evaluating your behavior.
The first 90 days shape your account habits. If you develop strong sourcing discipline, listing discipline, and customer service discipline early, scaling gets easier. If you build on shortcuts, Amazon eventually exposes them.
The three mistakes that hurt new sellers fast
The first is poor inventory judgment. Sellers either buy too much of a weak product or run out of a good one because they didn’t plan reorder timing.
The second is weak account maintenance. Customer messages, stranded inventory, policy notices, and listing issues can sit in Seller Central longer than they should if you’re not checking the account consistently.
The third is chasing noisy products. New sellers often buy what everyone is talking about instead of what sells steadily.
Why underserved ASINs matter more than hype
One of the smartest ways to grow is to look for underserved ASINs, meaning products with steady demand, weak competition, and poor listing quality. According to Nformed’s guide to low-competition Amazon products, these opportunities often show up in products with fewer than 5-10 sellers, and they can produce more predictable margins than trend-driven products.
That matters because beginners usually search for excitement, not stability. Stable products are often better businesses.
A useful screen looks like this:
- Low seller crowding: If an item has a small seller count, it’s easier to understand the competitive field.
- Weak existing listings: Bad images, poor bullets, or neglected copy leave room for execution.
- Consistent demand signals: You want movement, not a one-week spike.
- Reasonable price positioning: Buyers should be able to understand the value quickly.
Don’t build your first quarter around “hot products.” Build it around products you can source repeatedly, list cleanly, and restock with confidence.
A simple first 90-day operating rhythm
Use the first month to stabilize the account. Make sure listings are compliant, pricing makes sense, and orders are flowing correctly.
Use the second month to watch what sells and where the friction is. Maybe your sourcing is fine but your listing quality is weak. Maybe your listing is solid but the product is too competitive. Diagnose that accurately.
Use the third month to narrow the catalog. Keep what’s repeatable. Drop what creates support issues, restriction headaches, or weak margins.
What works better than most beginners expect
Boring consistency wins. Checking account health, keeping documentation organized, responding to issues quickly, and sourcing products you understand will outperform random bursts of activity.
If you’re asking “can i sell items on amazon” because you want a business, not just a one-time experiment, think in systems. Every SKU should have a sourcing reason, a margin reason, and a compliance reason. If one of those is missing, the product usually becomes a problem.
Your Path to Becoming an Amazon Entrepreneur
Selling on Amazon is accessible. Running it well takes judgment.
The path is straightforward when you break it into the right decisions. Start with clean documents and consistent business information. Choose a seller plan that fits the business you want to build. Check restrictions before you buy inventory. Understand your fees before you set prices. Build listings that comply with Amazon’s catalog rules instead of trying to patch them later.
That’s what separates motion from progress.
Amazon is large enough to support serious entrepreneurs, but it’s structured enough to punish careless ones. That’s good news if you’re willing to operate cleanly. A marketplace with rules creates room for disciplined sellers to stand out.
You also don’t need to do everything at once. Start with one workable sourcing model. Learn one category well. Get one listing process right. Build one repeatable replenishment habit. Scale from competence, not excitement.
The question isn’t really “can i sell items on amazon.” You can. The better question is whether you’ll approach it like a real operator.
If you do, the opportunity is real. Amazon’s marketplace already supports hundreds of thousands of independent sellers at meaningful revenue levels, and new sellers continue to enter because the demand is there. Your advantage won’t come from luck. It’ll come from preparation, restraint, and better execution than the average beginner.
If you want more practical playbooks on Amazon FBA, private label, sourcing, and internet business growth, explore the guides and tools at EntreResource.