

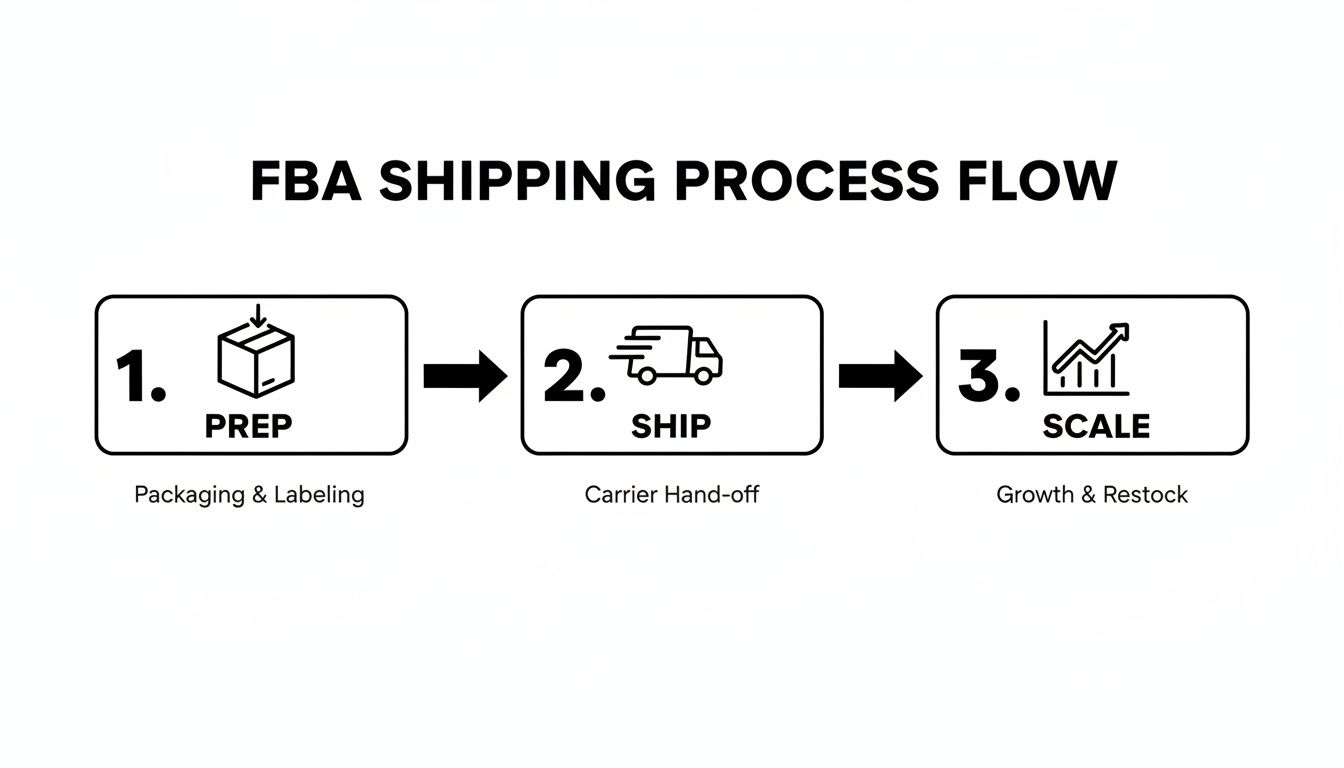
Let's be real: getting your products to an Amazon FBA warehouse can feel like navigating a minefield. One wrong move with your prep, labels, or carrier choice, and you're stuck with costly delays, angry emails from Amazon, and—worst of all—dead inventory that isn't making you money.
This isn't just another basic overview. I'm going to walk you through the entire inbound shipping process, from creating a shipment in Seller Central to choosing the right carrier. We'll cover the exact strategies that successful private label, arbitrage, and wholesale sellers use to turn logistics from a liability into an advantage.
Think of this as the guide I wish I had when I started—a complete breakdown for getting your products checked in quickly so you can get back to growing your business.
The Complete FBA Inbound Shipping Guide
The competition on Amazon is no joke. As of early 2026, you're not just competing for sales; you're competing for warehouse space and attention against a backdrop of over 9.7 million sellers worldwide. Of those, more than 2.5 million are active sellers, according to the latest seller statistics on Forceget.com.
What's really telling is that over 82% of these active sellers use Fulfillment by Amazon (FBA). This isn't just a random statistic. It means that the FBA inbound process is more crowded and critical than ever. Nailing your shipping isn't optional if you want to earn and keep that Prime badge.
Why Your Shipping Strategy Is Everything
A smart inbound plan does more than just move boxes. It’s a core part of your business that directly impacts your cash flow, scalability, and even your account health. Flying blind is a recipe for stockouts, surprise fees, and a tanking IPI score.
Here's why getting this right from day one is so important:
- Slash Your Costs: Knowing when to use Small Parcel Delivery (SPD) versus Less-Than-Truckload (LTL) can literally save you hundreds or even thousands of dollars on a single shipment. Industry reports frequently cite logistics as a top-three cost for e-commerce sellers.
- Get Your Products Live Faster: When you follow Amazon's prep and labeling rules to the letter, your inventory gets scanned and made available for sale in days, not weeks. Amazon's own guidelines state that compliance is the fastest path to sellable inventory.
- Protect Your IPI Score: A smooth shipping process is the first step to solid inventory management. This directly boosts your Inventory Performance Index (IPI), which is your ticket to unlocking unlimited storage. A high IPI score is essential for avoiding storage capacity limits, as confirmed by Amazon's seller policies.
If you want an even deeper dive on the subject, check out this ultimate guide to FBA inbound shipments.
Key FBA Shipping Terms at a Glance
Before we jump into the "how-to," let's get the language down. The FBA world is full of acronyms, and knowing what they mean is the first step to feeling in control of your shipments.
Here are the essential terms you'll see over and over again.
| Term/Acronym | What It Means for Your Business |
|---|---|
| FNSKU | This is Amazon’s internal barcode. It’s unique to you and ensures your products don’t get mixed with a competitor’s identical item. |
| SPD (Small Parcel Delivery) | Shipping individual boxes using carriers like UPS or FedEx. This is your go-to for smaller, lighter shipments. |
| LTL (Less-Than-Truckload) | Shipping your boxes on a pallet via a freight carrier. It's almost always cheaper for large, heavy shipments. |
| BOL (Bill of Lading) | The legal contract between you and the freight company for LTL shipments. You can't ship a pallet without it. |
| Partnered Carrier | These are carriers like UPS and Amazon Freight that have a deal with Amazon. You get heavily discounted shipping rates by booking them through Seller Central. |
Memorize these. They're the foundation of everything we're about to cover.
Creating Error-Free Shipments in Seller Central
The "Send to Amazon" workflow in Seller Central is where your entire inbound shipping process lives. I can't stress this enough: getting this part right is everything. One tiny mistake here can create a domino effect of delays, leaving your inventory stranded and your sales dead in the water.
Think of this process less like a chore and more like drawing up the blueprint for your shipment’s entire journey.
The very first thing you'll do is confirm your "ship from" address. This seems like a small detail, but it's what Amazon uses to calculate your shipping costs, especially if you plan to use the Amazon Partnered Carrier program (which you probably should). An old or incorrect address can lead to some nasty surprise charges later on, chewing right into your profit margins.
Using Amazon's partner carriers can slash your shipping costs, but those discounts only work if your initial data is spot-on.
The big takeaway here is that shipping isn't just a one-off task. It's a cycle. A smooth delivery process is what allows you to restock faster, grow your sales, and scale your brand.
Case Packs vs. Individual Units
One of the first hurdles for new sellers is the choice between "Individual products" and "Case-pack products." The difference is simple, but getting it wrong is a classic rookie mistake that can jam up the receiving process at the fulfillment center.
Here’s the breakdown:
- Case-Pack Products: This is your go-to if you're shipping boxes where every single item inside is identical. Same SKU, same condition, everything. For example, a master carton with 24 units of your new private label garlic press is a case pack. The key rule, per Amazon's guidelines, is that every case in that shipment must contain the exact same quantity of that one SKU.
- Individual Products: You’ll choose this if your boxes are a mix of different SKUs. This is super common for arbitrage sellers who might be packing a few books, a couple of toys, and a home good all into one big box to send off.
I’ve seen it happen—messing this up can get your entire shipment flagged for manual processing. That means major delays. Amazon's system is built for speed, and it assumes the box contents perfectly match what you declared in your shipping plan. This is a well-documented issue in seller forums.
Let’s say you’re sending in a test batch of a new accessory. You have 50 units total, packed into two boxes of 25. You'd create a case-pack template for "25 units per case" and tell Amazon you're sending "2 cases." Easy. Amazon knows exactly what to expect.
On the other hand, if you're an arbitrage seller with 30 different items, you'd pick "Individual products" and then manually enter the quantity for each unique SKU in your shipment.
Filling Out Your Shipment Details
Once you've told Amazon how you're packing your items, you'll move through the rest of the "Send to Amazon" workflow. This is where you confirm how many units you're sending, print out your FNSKU labels (if you need them), and get your boxes ready to go.
This is also where Amazon decides where your inventory is going. Based on your product category, its size, and even your location, Amazon will assign your shipment to one or sometimes multiple fulfillment centers.
A 2026 survey showed that 23% of shoppers will ditch their cart if delivery is too slow. This is exactly why Amazon spreads inventory across its network—to shrink delivery times for Prime members. For you, this means a single shipping plan might get split into several smaller shipments heading to different states. It can feel like a pain and sometimes adds a little cost, but it's a non-negotiable part of Amazon's logistics strategy. Trying to game the system to avoid splits is a quick way to get a warning on your account.
Your last step in this phase is providing the box-level details. You can do this by uploading a spreadsheet or just typing it directly into Seller Central. You'll enter the weight and dimensions for each box, which is the final piece of the puzzle Amazon needs to generate your shipping labels. Be precise here. As stated in Amazon's FBA policy, penalties for overweight or oversized boxes are real, and they're no fun.
Getting Your Products Prepped and Labeled for FBA
Getting your product prep right isn't just a "best practice"—it's one of the most critical parts of the FBA process. I’ve seen countless sellers get hit with unplanned fees and week-long receiving delays, all because of a simple mistake with a poly bag or a barcode.
Think about it from Amazon's perspective. Their fulfillment centers are a whirlwind of conveyor belts and scanners. A poorly prepped item can jam up the whole system. Every second a warehouse associate spends fixing your label is a second your inventory isn't getting checked in and made available for sale. Getting this right from the start saves you headaches and protects your profit margin.
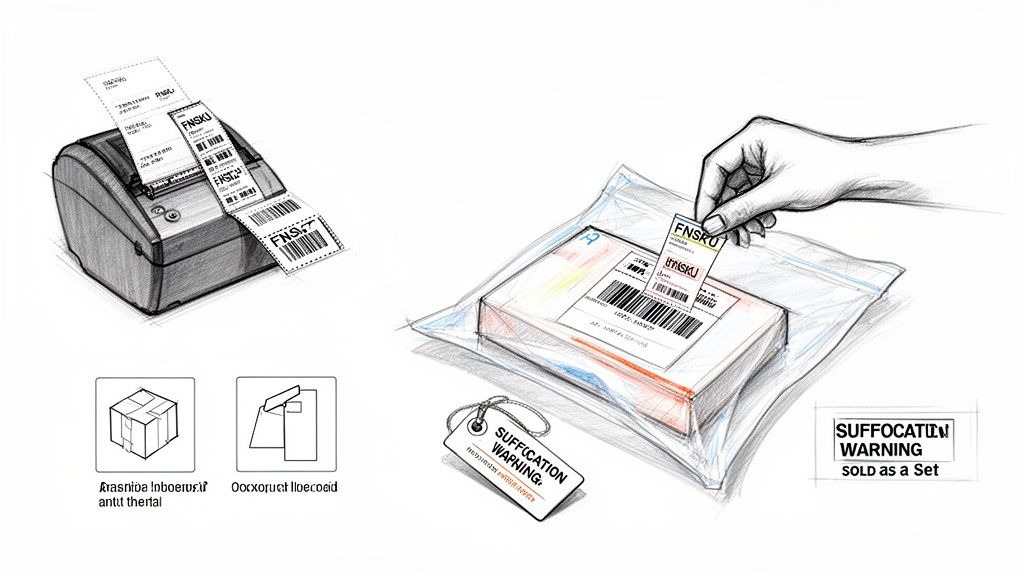
The FNSKU Is Your Best Friend
If there's one thing you need to get obsessed with, it's the FNSKU (Fulfillment Network Stock Keeping Unit). This is Amazon's internal barcode that links your product directly to your seller account. It’s not the same as a UPC (Universal Product Code), which is the standard manufacturer barcode you see on most retail products.
You might be tempted to use the manufacturer's UPC to save a step. This is called "commingled inventory," and it's a disaster waiting to happen. It means Amazon throws your products into a bin with the exact same items from every other seller. If one of them sends in a batch of fakes or damaged goods, there’s a real chance your customer will receive their junk.
Using an FNSKU is your #1 defense against commingling. It guarantees that the specific unit you sent in is the one your customer receives. This gives you total control over quality and protects your brand's reputation. This is why many leading FBA experts strongly advise against commingling.
When you apply the FNSKU label, make sure it completely covers any other scannable barcode, like the original UPC. If a scanner sees two barcodes, it gets confused, and your item gets flagged for manual processing. That means delays.
Essential Prep for Common Product Types
Beyond the FNSKU, certain products have their own specific prep rules. Ignoring these is a surefire way to get your products damaged, lost, or rejected at the warehouse. We have a full guide on how to create Amazon FBA labels, but here are the big ones you'll see most often.
- Loose Products: Anything that isn't in its own packaging (like a single dog toy or a kitchen utensil) has to go into a clear poly bag.
- Textiles and Fabrics: All clothing, towels, and other fabrics must be in a poly bag. This is non-negotiable. It protects them from dust, dirt, and moisture while sitting on a warehouse shelf.
- Liquids and Powders: These items need a double seal to prevent leaks, which can damage entire shipments. A screw-on cap with a safety seal underneath is one way. If it doesn't have that, you must put it in a securely sealed poly bag.
- Fragile/Glass Items: Bubble wrap is your friend here. Amazon's rule of thumb is that the item, once wrapped, must be able to survive a 3-foot drop onto a hard surface without breaking. Test it.
Mandatory Warning Labels
Some packaging requires specific warning labels to meet both Amazon's rules and general product safety standards. These aren't suggestions; they are mandatory.
- Suffocation Warnings: Any poly bag with an opening of 5 inches or more (when laid flat) absolutely must have a suffocation warning. You can buy bags with the warning pre-printed or apply a sticker. This is a requirement under both Amazon's terms and consumer product safety regulations.
- "Sold as a Set" Labels: If you're bundling items, like a shampoo and conditioner combo, you need to add a label that says "Sold as a Set" or "This is a Set, Do Not Separate." This is crucial to stop warehouse workers from breaking up your bundle and selling the pieces individually.
A huge part of avoiding these headaches is using the right labels in the first place. You can get your shipping and mailing labels printing sorted out right in Seller Central. I highly recommend investing in a thermal printer. The labels are smudge-proof and scan perfectly every time, which is more than I can say for standard inkjet or laser labels that can easily smear and become unreadable.
Choosing The Right FBA Shipping Carrier And Service
This is where your logistics strategy hits the road—literally. Getting your products to Amazon is one of the few places where every single dollar you save goes directly into your pocket as pure profit.
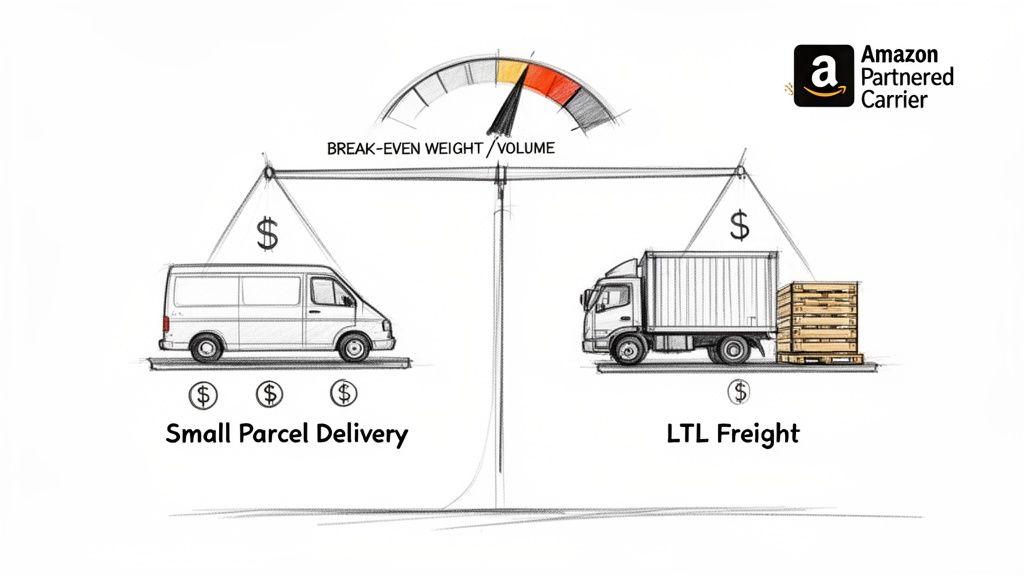
Your two main options for shipping inventory to FBA are Small Parcel Delivery (SPD) and Less-Than-Truckload (LTL) freight.
Understanding when to use each one is the first real step toward mastering your inbound shipping costs. This isn't just about picking UPS or FedEx; it's about matching the right service to the size and weight of every shipment you create.
Small Parcel Delivery (SPD) Explained
Small Parcel Delivery is exactly what it sounds like: you're sending individual boxes to Amazon's fulfillment centers. If you've ever dropped a package at a UPS Store or had USPS pick up from your house, you've used SPD. This is the go-to method for almost every new seller and for anyone sending in smaller batches of inventory.
Let's say you're sending in 50 units of a new gadget, packed into two boxes that weigh 20 lbs each. SPD is the obvious, no-brainer choice here. It's fast, simple, and integrates seamlessly right into the "Send to Amazon" workflow.
But as your business scales, so will the size of your shipments. Sticking with SPD for larger shipments is one of the fastest ways to burn through your profits.
The Power Of Less-Than-Truckload (LTL)
When your shipments get bigger, it's time to graduate to Less-Than-Truckload (LTL) shipping. This is where you consolidate all of your individual boxes onto pallets and send them via a freight carrier. It's designed for shipments that are too big and heavy for SPD but don't require a full semi-truck.
The real beauty of LTL is how it's priced. Instead of paying a rate for every single box, you're paying for the space your pallet takes up on the truck. This creates a tipping point where LTL becomes drastically cheaper than SPD.
As a personal rule of thumb, the moment my total shipment weight climbs past 150–200 lbs, I immediately start comparing LTL rates. The savings are often massive, easily cutting inbound shipping costs by 30-50% compared to sending the same inventory via SPD. This cost-saving threshold is widely cited by logistics providers and FBA consultants.
For example, sending ten 40 lb boxes (400 lbs total) via SPD could easily cost you a few hundred dollars. That same 400 lbs, stacked on a single pallet and shipped LTL, would be significantly cheaper—even after factoring in the cost of the pallet itself.
SPD vs LTL Which FBA Shipping Method to Choose
Deciding between SPD and LTL isn't just about weight. You also have to think about speed, handling, and how quickly you need your inventory to be checked in at the fulfillment center. This table breaks down the core differences to help you make the right call.
| Factor | Small Parcel Delivery (SPD) | Less-Than-Truckload (LTL) |
|---|---|---|
| Ideal Shipment Size | Under 150-200 lbs, just a few boxes. | Over 150 lbs, multiple boxes that can be put on a pallet. |
| Cost Structure | Priced per box, based on weight and dimensions. | Priced per pallet, based on freight class, weight, and distance. |
| Transit & Check-in Time | Generally faster transit and quicker check-in at Amazon. | Slower transit; requires a delivery appointment and can have longer check-in times. |
| Packaging Requirements | Standard shipping boxes. | Boxes must be stacked on a standard pallet, stretch-wrapped, and labeled correctly. |
Ultimately, using SPD is about speed and convenience for smaller shipments, while LTL is all about cost-savings at scale. As you grow, you'll likely use a mix of both depending on the situation.
The Amazon Partnered Carrier Program
The absolute easiest way to get deep discounts on your FBA shipments is by using the Amazon Partnered Carrier Program. When you're building your shipment in Seller Central, you'll see an option to use Amazon's partnered carriers—which is almost always UPS for SPD and Amazon Freight (or a similar partner) for LTL.
The costs are billed directly to your Amazon seller account, so you don't need to open or manage separate accounts with the carriers. For pretty much any domestic shipment, using a partnered carrier is a no-brainer. The discounts are huge, and the process is built right into the workflow.
If you want to get even more granular with your shipping strategy, our guide on the cheapest way to ship by comparing UPS, FedEx, and USPS offers some extra tips.
There are some rare cases where using a non-partnered carrier makes sense, like for certain oversized products or when importing goods directly with a freight forwarder. But for the vast majority of sellers, the cost savings and convenience of the partnered program are just too good to ignore.
Navigating Peak Season and International Shipping Complexities
Shipping during Q4 or a major sales event like Prime Day is a completely different beast. You can throw your standard lead times right out the window. Every single part of the supply chain, from the carriers to the warehouse workers, is under immense pressure. The only way to survive with your inventory levels (and sanity) intact is to plan like your business depends on it—because it does.
During these peak times, Amazon's fulfillment centers are absolutely slammed with inbound inventory. This isn't an exaggeration. Check-in times can balloon from a couple of days to several weeks. If you ship too late, you'll miss the boat on crucial shopping events like Black Friday and Cyber Monday. That miscalculation leaves you with a pile of dead stock and a gaping hole where your holiday sales should have been.
Planning Your Peak Season Shipments
Your peak season shipping strategy needs to be locked in months ahead of time, not weeks. Amazon announces its inventory cut-off dates for major holidays, and you have to treat these as gospel. Your goal shouldn't be to just meet these deadlines; it should be to get your inventory delivered well before them.
Another thing you absolutely must budget for is the spike in fees. Successful shipping to Amazon FBA during the holidays means eating these increased costs, which can take a serious bite out of your margins. We can expect the 2026 fee schedule to follow the trend of previous years, with higher rates kicking in from October 15, 2025, to January 14, 2026. These peak charges don't just hit standard FBA; they apply to Remote FBA, MCF, and Buy with Prime, too. As a recent analysis of Amazon's peak season fees shows, even a simple t-shirt could see its fulfillment cost jump from $4.67 to $5.00 per unit.
The biggest mistake I see sellers make is underestimating how long everything takes in Q4. My personal rule of thumb is to add at least two to three weeks to my normal shipping and receiving timeline. If my inventory usually gets checked in within ten days, I plan for a full month. Trust me on this.
Demystifying International Shipping
If you're sourcing products from overseas, international shipping adds a whole other layer of headaches to the process. You can't just plug your supplier's address into Seller Central and cross your fingers. Getting this wrong is a fast track to disaster. It requires a perfectly coordinated effort to handle customs, duties, and logistics.
This is where a freight forwarder becomes your most valuable partner. A good freight forwarder is your logistics expert on the ground, handling everything from picking up the goods at your factory in China to making sure they clear U.S. customs and get to the right Amazon warehouse.
You'll have a critical decision to make when it comes to shipping terms: DDP or DDU.
- DDP (Delivered Duty Paid): This is the one you want. It means your supplier or freight forwarder handles all customs duties and taxes before the shipment arrives in the U.S. Amazon absolutely requires this; they will not act as the importer of record or pay any fees for you.
- DDU (Delivered Duty Unpaid): With DDU, the shipment hits customs, and then you get a bill for duties and taxes. This is a nightmare scenario for FBA. Your shipment will be rejected, plain and simple.
The Importance of HS Codes
To get through customs without a hitch, every single product you import needs a Harmonized System (HS) code. This is a universal code used to classify products for trade, and it's not something you can just guess. Your freight forwarder is the expert here and can help you nail down the right code for your items.
Don't take this lightly. Declaring the wrong HS code is a serious blunder that can get your shipment flagged and held at the port for a detailed inspection. We're talking massive delays and potential fines. Working with your freight forwarder to get your product classifications right from the start isn't just a good idea—it's a non-negotiable part of successful international shipping.
Avoiding Costly FBA Shipping Mistakes
If there's one thing I've learned from my years in the FBA game, it's that learning from someone else's expensive shipping mistake is a whole lot cheaper than making your own. Even a tiny slip-up can create a domino effect of rejected shipments, surprise penalty fees, and profits that just vanish into thin air.
Think of this section as your troubleshooting playbook, built from real-world FBA horror stories. By knowing the most common pitfalls upfront, you can build an inbound process that saves you an incredible amount of time, money, and stress.
The Most Common—and Costly—Errors
Honestly, it’s almost always the simple stuff that causes the biggest FBA shipping headaches. Forgetting to put the right FNSKU label on a product, for example, can get your entire shipment pushed aside for weeks while someone at Amazon manually sorts it out. It’s a completely preventable mistake with massive consequences.
Another classic blunder is sending in boxes that are overweight or too big. Amazon has very strict rules here for a reason—their warehouses are hyper-automated. Any box over 50 lbs needs a "Team Lift" sticker, and anything over 25 inches on any side is oversized. Get this wrong, and you're looking at rejections or penalties, not to mention a nasty warning on your account health dashboard.
A rejected pallet at a fulfillment center is a logistical nightmare. I’ve seen it happen, and it's almost always due to bad stacking—boxes hanging over the pallet edge, an unstable build, or not enough stretch wrap. The cost to get that LTL shipment back, fix it, and reship it can easily erase every penny of profit from that inventory.
You don't have to be the one doing all this tedious work. As we've discussed before, using an Amazon prep company can save you significant time and money by making sure every one of Amazon's rules is followed to the letter.
Troubleshooting Delayed Shipments
One of the most frustrating things you'll experience as a seller is seeing your shipment tracking marked "Delivered," but the inventory is nowhere to be found. First off, don't panic. This is pretty common, especially during Q4 and other peak times.
Here’s what to do:
- Wait It Out (At First): It can easily take Amazon 7-14 days (or even longer during the holidays) to move a shipment from the delivery dock to the actual check-in process.
- Keep an Eye on the "Send to Amazon" Page: Watch the status of your shipment in Seller Central. As long as it eventually moves from "Delivered" to "Receiving," you know things are moving along.
- Time to Reconcile: If the eligible date passes and your inventory still hasn't been checked in, you can open a case using the "Reconcile" tab in your shipment summary. You’ll need to have proof of ownership and delivery ready, like a signed Bill of Lading (BOL) for LTL shipments, to get them to investigate.
A solid process means you plan for these things. I always take clear photos of my finished pallets before the carrier picks them up, keep all my tracking info organized, and just accept that delays are part of the business. A proactive approach is what turns a potential disaster into a minor inconvenience.
Even when you think you have your shipping process dialed in, unexpected questions always seem to surface. It's just part of the game. Let's walk through some of the most common hurdles I see sellers face when getting their products into Amazon's hands.
What Is the Difference Between an FNSKU and a UPC?
Think of a UPC (Universal Product Code) as the generic barcode a product gets from the manufacturer. It's the same for every single unit of that product, no matter who is selling it.
An FNSKU (Fulfillment Network Stock Keeping Unit), however, is your personal barcode from Amazon. It links a specific unit of a product directly to your seller account.
Using an FNSKU is non-negotiable in my book. It’s the only way to prevent your inventory from being “commingled” with the same products from other sellers. If you let Amazon commingle your stock and another seller sends in a batch of fakes or damaged goods, your customer could get their garbage product. This can lead to terrible reviews and account health strikes that are completely out of your control. The FNSKU ensures the exact item you sent in is the one your customer receives.
How Do I Fix Stranded Inventory?
Stranded inventory is one of the most frustrating things to see in Seller Central. It means your products are physically sitting in a warehouse, but they’re not actually for sale. Essentially, Amazon has your stuff but has no idea what to do with it.
This usually happens because of a simple error—a typo in the listing, a missing bit of information, or maybe the listing itself was deleted.
To fix it, navigate to the "Fix Stranded Inventory" page from your main Seller Central dashboard. Amazon’s tool is pretty good at diagnosing the exact reason for each stranded ASIN and will give you clear, actionable steps to get it back online. It's usually a quick fix, but you have to be proactive about checking for it.
Can I Ship Directly From China to Amazon FBA?
Yes, you can absolutely ship from a supplier in China (or anywhere else) straight to an Amazon fulfillment center. But—and this is a big but—it has to be done perfectly, or you're in for a world of pain.
The single most important rule is that your shipment must arrive Delivered Duty Paid (DDP). This means all customs duties, taxes, and fees are fully paid before the truck ever shows up at Amazon's warehouse.
Amazon will not act as the Importer of Record. They won't pay a single cent in customs fees for you. If a shipment arrives with duties owing (Delivered Duty Unpaid or DDU), Amazon will reject it on the spot. This creates an expensive, logistical nightmare to sort out. This is explicitly stated in Amazon's FBA import and export policies.
Frankly, because of the complexity, trying to manage this yourself is a huge risk. Always use a reputable freight forwarder or customs broker. They handle the entire process, from picking up the goods at the factory to clearing customs and booking the final delivery. It’s an expense that pays for itself in avoided disasters.